Hewlett-Packard and HP Compaq laptops: How to remove the Hard Drive
Hewlett-Packard has developed numerous laptop models in different internal components layout designs. The purpose of this article is to help you to decide if it's worth to do the drive removal procedure by yourself or rather turn to qualified service agents. Bear in mind that servicing internal components increases the risk of damaging the computer which might not be covered under the manufactory warranty. Understand the risk and refer to the product's warranty before attempting to service the computer.
HP Laptops from Group #1
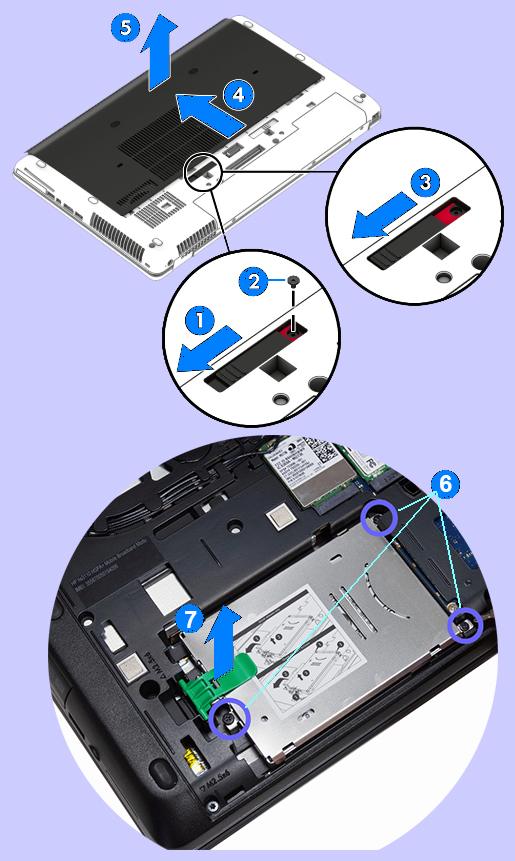
For simplicity, let's categorize all HP laptops into two large groups by its drive location layout. First group is for the computers that allow relatively easy access to the drive from the bottom side, located right under serving hatch specially designated for fast drive replacement. HP ZBook 15 G2 is a typical representative of this group.
- Slide the service cover release latch to the left (1), and then remove the optional Phillips screw (if the screw is being used) (2).
- Slide the release latch again (3) to release the service cover.
- Slide the service cover toward the front of the computer (4), and then lift to remove the service cover (5).
- Loosen the 3 hard drive captive screws (6).
- Pull up the hard drive tab (7) to disconnect the hard drive
- Remove the hard drive bracket from the hard drive.

HP Laptops from Group #2: Complex Hard Drive Removal
All other laptops that must be partially disassembled to remove the drive we refer to the next group of HP notebooks. To remove a drive from these computers you may need to have a certain technical experience and skills and be ready to challenge a complex chassis disassemble task, otherwise you may consider a qualified technician help. Just to mention about complexity of such task we give an example of disassembling steps for HP ENVY 15-k000 and HP Pavilion 15-p000 Notebook PCs.
You need a Phillips head screwdriver, tweezers or needle-nose pliers, and a non-metallic prying tool. Besides, HP strongly recommends the use of an anti-static wrist strap and a conductive foam pad when working on the computer. First step is removing the battery and the optical drive. Then start removing the top cover of laptop: On the bottom of the notebook, remove the two rubber feet from the rear corners. Remove the Phillips-head screws that secure each of the corner covers to the base enclosure. Carefully lift the corner covers to disengage the tabs that secure them to the base enclosure and remove. To begin removing the top cover, remove the Mylar screw cover from the base enclosure. Remove the fifteen Phillips-head screws that secure the top cover to the base enclosure. Remove the three Phillips broad-head screws from the optical drive bay that secure the top cover to the base enclosure. Turn the computer over and open the display panel. Carefully separate the edges of the top cover from the base enclosure. Lift the front edge of the top cover until you have access to the touchpad board connector on the system board. Carefully and using minimal force, lift the locking bar up on the touchpad board connector and disconnect the touchpad board ribbon cable from the system board. Carefully and using minimal force, lift the locking bar up on the keyboard connector and disconnect the keyboard ribbon cable from the system board. Using minimal force lift up on the locking bar on the finger print reader ribbon cable connector and disconnect the finger print reader ribbon cable from the system board. Using minimal force, lift the locking bar up on the keyboard light connector and disconnect the keyboard light ribbon cable from the system board. Carefully and using minimal force, lift the locking bar up on the power button board ZIF connector and disconnect the power button board ribbon cable from the system board. Lift and remove the top cover.
Being careful and using minimal force, lift the locking bar up on the USB board connector and disconnect the USB board ribbon cable from the system board and disconnect the USB board ribbon cable from the system board. Lift the locking bar up on the hard disk drive adapter connector, then lift the locking bar up on the hard disk drive adapter connector and disconnect the hard disk drive adapter ribbon cable from the system board. To remove the hard disk drive, lift the right edge of the hard disk drive assembly and slide the tabs on the right side of the hard disk drive assembly out of the notches in the base enclosure and remove the hard disk drive assembly.
After you are done with the drive removal you may place the hard disk drive in a static dissipative bag for protection and ship to DataLab247 data recovery lab for service.
| HP laptops in Group #1 (fast and easy drive removal) | HP laptops in Group #2 (complicated) |
|---|---|
|
|
NOTE: Only few models of HP laptops were included in this table, as the examples of HP and Compaq drive removals.
HP Laptop Drive Removal Example
How Data Lab 247 works
A quick look into how DataLab247 Lab works, from the point of view of people we helpedSeagate Barracuda LP in-lab repair needed to fix errors and problems
This drive has broken reading/writing HDD heads with partially scratched disk.
Can we get a number in regards to what constitutes a partial recovery in terms of percentage wise? What if the customer agrees and only gets 50% of RAW data I don't think that would work out.
I will present the recovery result to him once we have a guideline of some sort.
This is a surprisingly good result for seemingly intractable problem. A middleman in Philadelphia
Lost data recovery from hard drive, MQ01ABB200 2Tb external
Local IT technician performed some diagnostic tests and tried new circuit board, but did not open the drive's cover. Some faint clicking sound is coming from inside the drive. According to Google you know how to handle this model in your data recovery lab. Documents and projects are critical.
Fast data recovery for seemingly inevitable data loss case. Dentist clinic in Mississauga
ST2000DM001 2Tb - Fixed disk parameter table or bios error
We have an iMac running Leopard and the external Seagate FreeAgent Dekstop with pre-installed time machine backup software.
Drive is HFS+ formatted. It was working fine for about a year.
Then my Mac stopped recognizing the external drive. It also failed all tests with Mac Pro.
Drive is invisible in Disk Utility and it could not be detected in Apple System Profiler either.
Damaged head assembly was replaced in the clean lab and files were restored to the new drive. Boston City Hall Plaza


